Restoring the Spitfire
- joepampel
- Mar 18, 2024
- 4 min read
Updated: Mar 27, 2024
My project management (nagging) turns into my day job working on cars.
I had bought a 1974 Spitfire in the winter of 1983-84 to get me to community college after leaving Plattsburgh. This was my very first car and I certainly bought with my heart, not my head. Within a short time I had spent several times more than the purchase price and then slowly came to realize the extent of the rust situation. I tried (unsuccessfully) to weld a section of frame in. [ I can weld just fine, I just did not understand how locate all the pieces to ensure that it was perfectly straight when I was done ] Leading me to find another 1974 Spitfire for sale, cheap, in much better shape in April of 1988. At worst, 2 would become one. I drove it up through the summer of 1993, when it went in for some serious work. My then GF, now wife, had moved in and had her uber-reliable 1989 Honda Accord which took daily pressure off the Spitfire. I had been driving it full time, summer and winter to both work and school. Driving a Spitfire through serious snow and ice is an experience. Keeping it running so I didn't miss work or school was a lot of pressure.
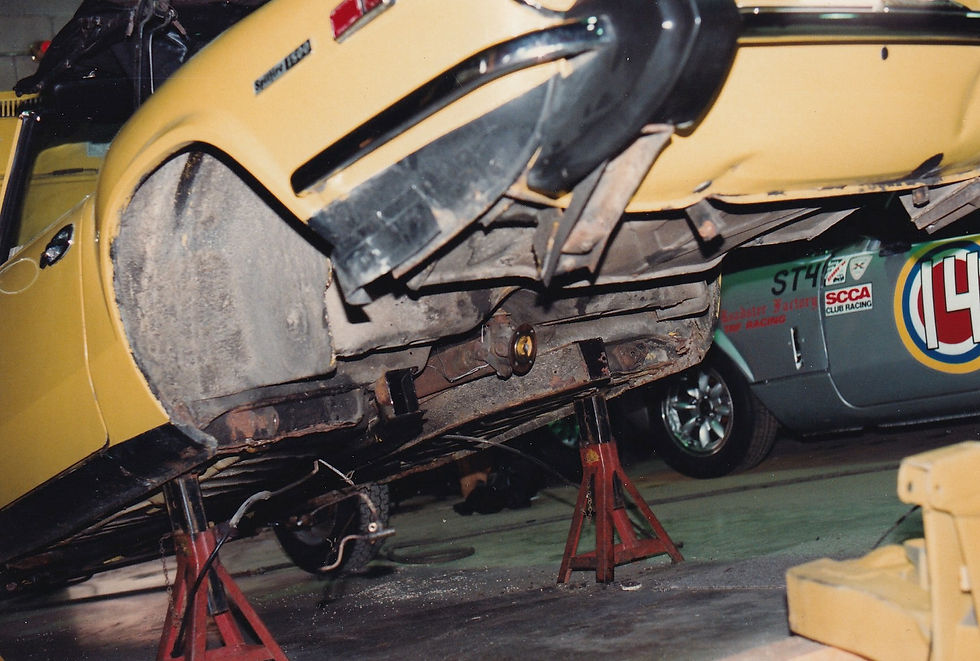
The Yellow car as I found it.


Hard to see in the pictures, but the bottom panels were all sprayed in "miracle paint" - rust stopper. The rear frame was in bad shape in the usual Spitfire place - right by the differential, and the rear floor had some poor welds where the radius rods attach. Another classic weak spot. So while it looks solid, it was not safe for the long run. It also had rusty floors.
First we fixed the frame at my friend's race shop by finding a section of pre-74 frame (without the outriggers for the rear bumper guards that caused the rust issue)

New "old" frame section painted in zinc primer and ready to weld in. You can see where the old frame got cut off, and the end of the driveshaft (marked in yellow)
Another view. The exhaust, and rear suspension were completely removed for this. You can see the miracle paint, and some tape, on the bottom of the rear fender and the sills. It was hiding a bit more rust than we expected.
Once the car had a solid foundation, it went in for bodywork & paint. I handled sandblasting the old hardware and sending it out for plating. You don't want to put the car back together with old rusty fasteners. After some discussions I conceded that not replacing the wiring harness would be a mistake so we ordered a new one from British Wire. Same issue, but even worse; the old wiring was falling apart after 10 years.
Step one was to disassemble it and get to work on the sills etc.

The inner and outer sill have been replaced on the passenger side here, and the interior and running gear have all be removed. Lots of cutting and grinding to remove the old stuff and get the new parts to fit. It is noisy & dusty work.

This is the scary phase; it is easy to take stuff apart and make a mess - anyone can do that. It's coming back from here that takes talent and grit. Luckily the folks doing the tricky stuff had that in spades.

Drivers side with the sill cut off, mid repair. We took off the rockers and outer sills to find the inner sill was also rusty. It all got replaced and seam welded (for strength). Sills are critical in a convertible for stiffness.

The body got DA'd down to bare metal for bodywork. We didn't take the body off or deal with changing the color in places that wouldn't show in order to save money. It's already a lot of work and expense.


Getting ready to go into the booth for the prime coat. You can see the seam sealer where the new rockers and sills were welded on. There is a skim coat of bondo, which is normal on any car. Even new ones leaving big factories have some body work to make them perfectly smooth.

another view.

Masked off. You can see the green primer on the frame repair here too.

Here it is after the prime coat and then edging the front firewall/frame area

It came outside to get wet sanded. Typically we would use a filling primer and then wet sand and long block etc. to get the minor imperfections out.

Edging the bonnet, you paint the inside first and then the outside. This is to help keep any overspray or imperfections on the inside where they are far less likely to be noticed.

There's the top of it fresh out of the booth. A spitfire bonnet with no dents, a first for me.

And there's the body fresh out of the booth; re-assembly has started with door handles, locks and window glass. This is the scary part, trying to get it all back together without scratching the nice new paint.

Dash wiring, instruments and dash are back and I've mounted up the rear suspension, brakes, lights and bumpers. The wiring while not trivial is not as hard as it might seem; the harness limits your options along with the dash & other mounting locations so you aren't sorting through dozens of possible wires for a connection.

Some of the interior work in progress.
Once the engine was back in we mounted the bonnet and front bumper. Then the car got taken back to my house by flatbed where I did all of the final assembly and got it running again. There were still lots of little things to deal with, fuel lines, electrical gremlins and so on, but it all got done and the little Spitfire lived again! 31 years later it is still in good shape.


Probably summer of 1994 here.

20 years later, in April 2014.


A car filled with heart, soul, sweat, and probably a generous amount of your skin cells.